RTS Marine Shooter : Mirror Networking
Members: 1
Duration: 5 weeks
Date: 2021

Brief
RTS Marine Shooter is a two-player multiplayer game made in Unity using Mirror Networking. When I started the Complex Games System module at AIE, I wanted to try something new, an RTS. The genre was something extraordinary back in the early gaming days with its intricate mechanics. I wanted to take on a challenge and see how these systems are implemented.
Systems
Spawning Marines Across the Network
Spawning the marines into the world was both a mind boggling and baffling experience. Seeing the marines come to life across the network was a good personal achievement, but the process to get there took more time than expected.
I have a GameManager that handles all of the command calls from the client. When the client (either player 1 or player 2) spawns a marine by calling the function, SpawnUnit, from the GameManager, the request gets sent to the server.

The command attribute above the CmdSpawnUnit function is used to tell the server to apply this function. We use the command attribute for this situation because we need to spawn a marine. Without it, one of the two clients wouldn't be able to see the marine. That is because the command attribute wasn't used. The attribute specifically tells the server to perform a task so that it synchronises with the network. I spawn the marine by using NetworkServer.Spawn(), which allows both clients to see the spawned marine.
Also, a quick note here. I discovered I had to instantiate the whole gameObject itself, hence the "unitScript.gameObject". This is because gameObjects are the only objects that can hold a NetworkIdentity component. A network identity component holds a unique identifier. This means the Mirror Network would be able to recoginise it and syncronise the object across the network.

I did spawn a marine, but what happened afterwards wasn’t exactly foreseen. The problem was, I wasn’t able to move my units. After a long investigation, I found that it was a bug in the Mirror Network.
For some odd reason, after I instantiate the marine, and let’s say I give it an id of 1. That id would soon be lost. The GameManager requires each marine to hold a reference to the GameManager. This is so we could tell whether it was player 1’s marine or player 2’s marine through an id check. However, our marine doesn’t have a GameManager assigned shortly after spawning it, and therefore we cannot move it.
A simple solution to this conundrum was using coroutines. I delayed the AddToUnitList function, a function whose job involves assigning a GameManger to the marine. The delay is small, about 0.5 seconds for safe measures. This ended up fixing the bug, and we can now move the marines around.
However, I soon discovered another bug. The marine’s position isn't properly set in the client’s view. When the host spawns a marine, its spawn position is set correctly in their game view, but as for the client, it's standing somewhere else. When the client spawns the marine, its position is set correctly, and it's the same for the host as well. The instantiation is done with the following:
Very odd. The transform aspect of the instantiation is not being considered. So, I went for the same solution with coroutines to fix the problem.

Both the host and the client are required to call this function. How come? Without it, we’d be seeing the same issue we just had. The ClientRpc attribute sends a message across all clients. As a result, the positions of the marines are updated correctly in both the perspectives of the host and client.
Anyways, the solution to our bug is to add another coroutine. It’s not ideal, but for the sake of avoiding this bug, I went with this solution.
Moving Marines Across the Network
As for making the marines traverse across the network, this method was relatively simple. The marines were moving to their positions using Unity’s Navmesh system. As for synchronising their positions over the network, the Mirror Network only requires a NetworkTransform component. In addition to the network’s requirements, I had also attached a NetworkAnimator, which synchronises the marine's animation across the network. Job all done.

Navmesh Grouping
When it comes to moving the marines, there’s one thing that needs to be considered in a game such as this, grouping. In RTS games, selecting a group of units would automatically group them up and instructing them to move would make them move in a formation.
We don’t quite have that yet. Instead, what I have right now is very overcrowded. When I do tell the selected group to move to a destination, they would all be actively trying to stand on the destination point. They would fight for the destination and push each other away. I could resolve this shuffling issue by increasing each unit’s stopping distance in the Nav Mesh Agent component. However, that solution seems tedious and the result of the solution doesn’t look as cool as one would imagine for an RTS game.
A solution I went with involved calculating each of their positions so that we can space them out to form a circle. I call the following function:
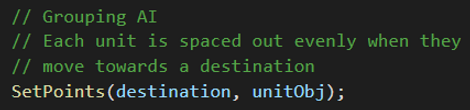
SetPoints handles all the calculations required to get each unit into a formation. I first calculated the centroid and assigned each unit a deltaAngle using their position and the centroid. Then I sort all units from the lowest angle and upwards. I copied each unit’s deltaAngle over to an array of angles.

Using this newly created array of angles, I called a function called SpreadAngles(), which sets each angle to form a circle. After calling the function, I’ve set up a quick dynamic radius. The radius increases in size the more units there are selected. Finally, I’ve calculated the targetPos of each unit and set the navmesh agent’s (unit’s) destination.
As a result, when more than one unit moves to a destination, they form a circular formation.
Panel selection
The one aspect I’ve always found fascinating in RTS games was the interactable ui. The fact that you could click on a building in the world and the ui panel would update to display the building’s stats and actions were astonishing. I really wanted that mechanic for my RTS game. So, let us begin.
To first get the ui panel to update, I would need a system that would identify every clickable object. RTS games use this system to identify what type of object the player is selecting. These objects can be a building type (barracks, house, supplies) or they could be a unit type (melee, ranged, medic). To get this going, I have defined a parent class called, WorldObject.
Quick side note here. All objects that inherit from MonoBehaviour are instead inherited from NetworkBehaviour. Doing so will allow objects to synchronise across the network.
Back to the topic, the classes derived from WorldObject are Unit and Building. Anything derived under WorldObject means it is a selectable object, which as result, updates the ui panel. WorldObject holds basic information such as health, a boolean to state whether it has been selected, and an icon used to identify the object in the ui panel.
Let’s say I select a building in the game. We first convert the screen position to world position and send out a raycast from the mouse. The building we select gets updated via GetComponent<WorldObject>(). We state that the building is now selected and call DisplayObjectInfo() to update the ui panel.
The UIManager script is attached to a prefab called, Input Canvas. This ui prefab is present in the game’s hierarchy and holds a collection of empty transforms. Some of these transforms contain a horizontal layout group component, and are used to display a WorldObject's information. For example, “Icon” is used to display the WorldObject’s icon, and ActionList is used to display worldObject’s list of available actions.
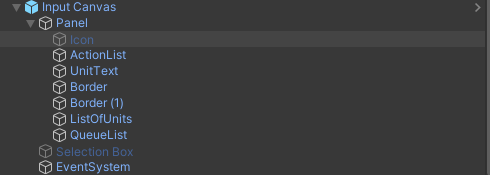

When the building does get selected, a series of action buttons are instantiated under the ActionList transform. These buttons are associated with the building's abilities. As of now, I can only spawn new marines into the field. This is all done by queuing them in a queue list and spawning them using NetworkServer.Spawn(). That information is visually portrayed under the “QueueList” transform. An image displaying unit icon is instantiated on the panel for every unit spawned with the action button.
The Input Canvas also updates when I select a Unit. It displays the unit’s icon, and when I select multiple units, the number of icons stack up. Another feature I’ve added to this panel is selecting individuals from a group of units. When a unit is selected from the panel amidst a group of units, every other unit is deselected and the player has control of that one unit.
